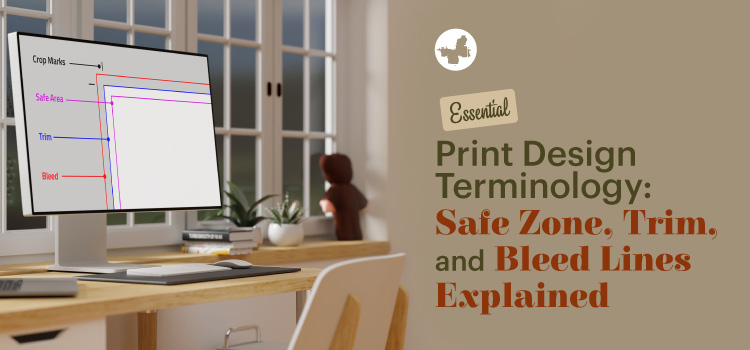
You might come across some terms that are unfamiliar or unclear if you are new to print design. Among these are terms related to file preparation and layout. Understanding these terms is crucial because they have a direct impact on the appearance of your final print product. The most important terms for the design process that you must consider are the safe zone, the trim area, and the bleed lines.
In this article, we will explain three essential print design terms to help you create a perfectly designed print product and present your brand professionally. This will help you match your final design with the expert standards accurately and effectively. Keep reading to learn the essential print terminology!
Contents
Safe Zone, Trim Line, and Bleed Area: What Is Their Meaning?
Before you begin designing your print project, you must understand the proper use of the trim line, bleed area, and safe zone. These terms will help you avoid any unwanted white spaces or cropped content while creating a design that fits the final dimensions of your print project. We will define each term, explore its significance, and discuss its applications.
What Is the Safe Zone?
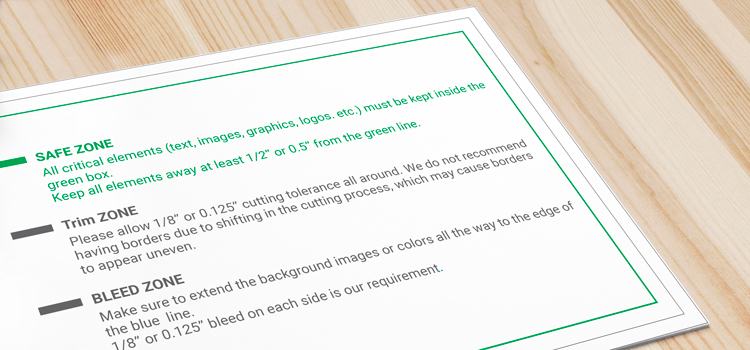
The safe zone is the area inside the trim line where you should place your most important information and graphics. It is also referred to as the margin or the inset. Additionally, it can explain the gutter, or centre, of the publication and the ease of viewing content in the middle of a magazine spread. Anything beyond this area runs the risk of being cut off.
The size of the safe zone depends on the type and size of your print project. Generally, 0.125 inches (3 mm) from the edge is a safe standard for most materials. This size is 0.125 inch (3 mm) for business cards, but 0.5 inch (12 mm) for posters.
To create a safe zone in your design software, you can use guides, rulers, or grids to mark the boundaries of the safe zone. You can also use templates that already have the safe zone marked for you. Make sure that all your text, logos, images, and other elements are within the safe zone and do not touch or cross the trim line.
What Is the Trim Line?
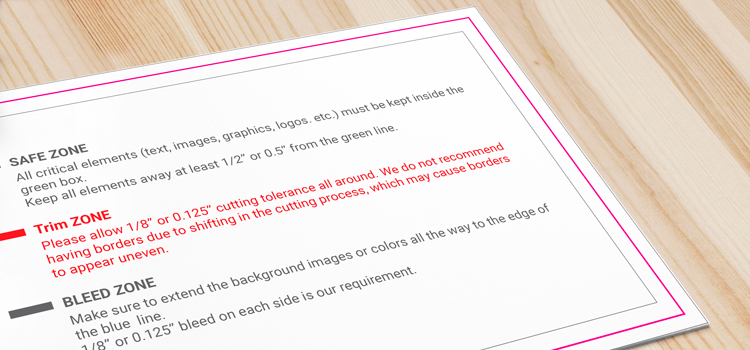
The trim line is the line where the printer will cut the paper to the final size of your print project. We also call it the cut line or the crop mark. It shows you the exact dimensions of your print project after it is trimmed.
The trim line is usually marked by thin black lines in the corners of your design. These lines are called crop marks, and they indicate where the paper should be cut. The crop marks are not part of your design, and they will not be printed on your final product. Trim sizes for different print products include:
- Posters: A3 (297 x 420mm)
- Business Cards: 2″ x 3.5″
- Postcards: 4″ x 6″, 5″ x 7″, or 6″ x 9″
- Flyers: Matching standard paper sizes, like A4 (8.3″ x 11.7″) or A5 (5.8″ x 8.3″)
The trim line is not always precise and accurate. Human or machine error can occasionally cause minor changes or variations in the cutting process. This indicates that there’s a chance the paper will be cut just inside or outside the trim line. Therefore, to prevent any unwanted white spaces or cropped content, you must include a bleed area and a safe zone in your design.
What Is the Bleed Area?
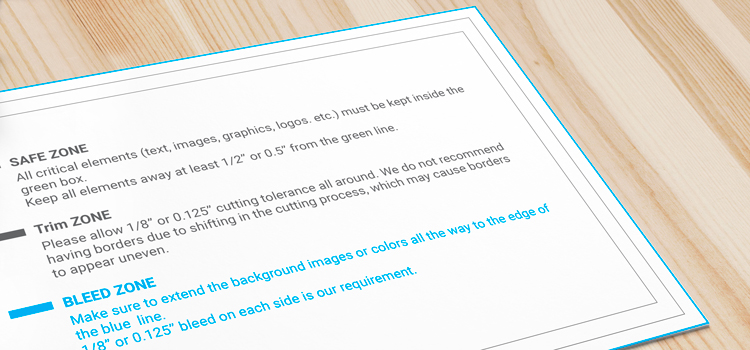
The bleed area is the area outside the trim line where you should extend your background graphics and colours. This term is sometimes referred to as the “bleed margin” or just “bleed.” It guarantees that, after trimming, your design will completely cover the edge of your paper with no white spaces remaining.
The size of the bleed area depends on the type and size of your print project as well as the printer’s specifications. The general bleed size for printing is 0.125 inches (3 mm) from each edge, but some printers may require more or less bleed. It is advised to check with your printer or online printing supplier for their recommended bleed size for your project.
The amount of bleed you should leave for printing depends on several factors, such as:
- The type and size of your print project
- The printer’s specifications and requirements
- The quality and accuracy of the cutting process
- The margin of error you are willing to accept
Leave at least 0.125 inches (3 mm) of bleed on each edge of your print project. This is enough to cover most variations and shifts in the cutting process. However, some printers may require more or less bleed depending on their equipment and standards. For example, some large-format printers may require up to 0.5 inches (12 mm) of bleed for posters or banners.
ButterflyGP is an expert wholesale print company with long-term experience working with different industries. You can check with our professional print team for the recommended amount of safe zone, trim line, and bleed area to make sure of a perfect final design.
Read More: How to Prepare Your Design for Printing?
Conclusion
The three essential print terminologies we explained here are the most important factors to consider for all your print projects. Don’t forget to place your most important information and graphics within the safe zone. Always follow the trim line standards to avoid cutting important information. Remember that you can only extend your background graphics and colours to the bleed area. Following these guidelines ensures your final print product will look professional and flawless. You can always consult with the ButterflyGP print team for the best quality print marketing materials!