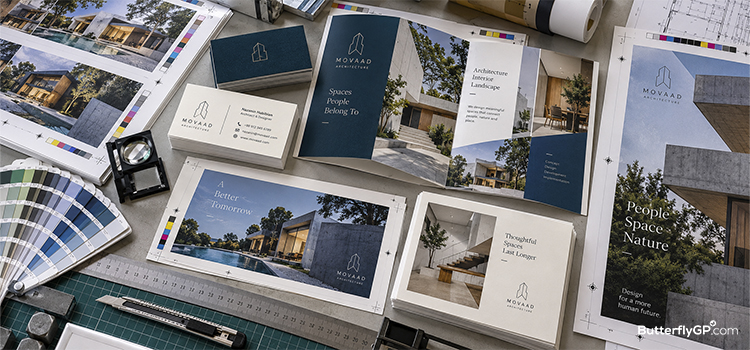
Missing bleed with text sitting too close to the edge is one of the most common file errors printers receive. Because artwork file issues are usually the customer’s responsibility, these errors can eat directly into your profit margins and waste your client’s valuable time.
By understanding the mechanics of the safe area, trim line and bleed area, and verifying that your client’s artwork accounts for them before submitting the file, you can ensure a flawless print run and avoid costly reprints.
The Three Zones at a Glance
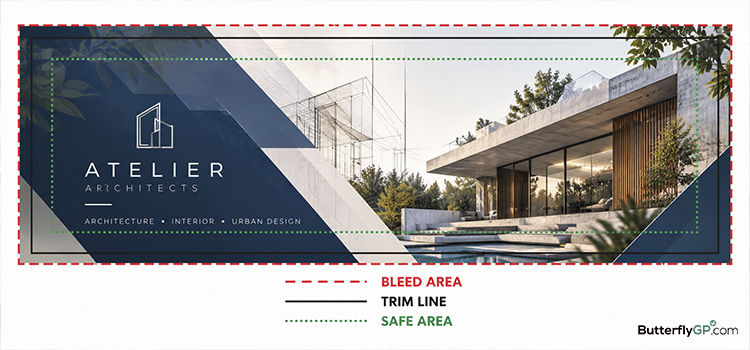
To visualize them better, think of safety, trim, and bleed lines as three nested rectangles from the inside out:
| Term | Where It Sits | What Goes There | Standard Size |
| Safe Area | Inside the trim line | Critical content (text, logos, key images) | 0.125″ (1/8″) inside the trim |
| Trim Line | The actual cut edge | Where the final product is physically cut | The final product dimensions |
| Bleed Area | Outside the trim line | Background colours, textures, and extending images | 0.125″ (1/8″) outside the trim |
What Is the Trim Line?
The trim line marks the exact boundary where the cutting blade falls to create the final product’s physical dimensions. It is the very first detail you should verify on a client’s file: if the trim size is wrong, the entire layout will be scaled, cropped, or rejected before bleed or safe areas even come into play.
A common point of confusion is treating the trim line and crop marks as the same thing. You shouldn’t draw the actual trim line directly on the design file; if the cutting blade landed slightly off, part of that printed line would show on the finished piece. Instead, small black indicators called crop marks are placed outside the design in the corners where they will be cut away. They act as crosshairs showing the operator where the invisible trim line falls.
Some printers require crop marks in your file, while others prefer files submitted without them, as automated systems set the cut dimensions based on your order specs. Always check with your wholesale partner, and if you do include crop marks, make sure they sit outside the bleed area so they’re trimmed away cleanly.
What Is Bleed?
The bleed area is the extra space outside the trim line (0.125″ or 1/8″ on all four sides) where you must extend your background graphics and colours.
Because commercial cutting involves massive stacks of paper, there is a normal cutting tolerance (about 1/16″), meaning the blade can slightly shift. This is why the bleed area is important. If the blade shifts slightly outward during the cut, the bleed ensures the design still covers the edge completely, preventing an awkward white line of unprinted paper from showing.
Be careful about the “Fake” Bleed; printers constantly receive files sized perfectly for bleed (e.g., 3.75″ × 2.25″), but the client simply left the outer 0.125″ border completely white rather than extending the background colour into it. Always verify that your client’s background is stretched to the very edge of the canvas before submitting the file.
What Is the Safe Area?
The safe area (or safe zone), as the name implies, is the area where all critical elements of the artwork, such as logos, text, and important details, are safe from being accidentally sliced off by the printer’s cutting blade. It acts as a safety buffer kept 0.125 inches (1/8″) inside the trim line.
Of course, keeping text and other key elements within the safe area isn’t just about preventing them from being cut off. When text sits too close to the trim edge, the finished piece will look off-centre, making the client’s brand appear cheap and poorly planned. Keeping content 3mm to 5mm away from the edge leads to a more professional look.
Putting It Together: A Business Card Example
Understanding the math makes checking client files incredibly easy. The golden rule to remember is: Document size = trim size + (2 × bleed).
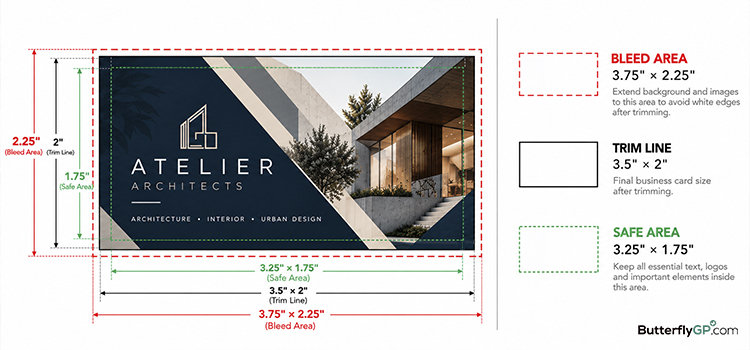
For example, a 3.5″ × 2″ business card with 0.125″ bleed should be set up at 3.75″ × 2.25″ (adding 1/8″ bleed on every side). A file that’s exactly 3.5″ × 2″ has no bleed, and a file with a completely different size will be scaled, cropped, or rejected. Beginners often add bleed to only one side, or not at all.
Advise your clients to set bleed in the document settings, not by resizing the canvas manually. In InDesign or Illustrator, define the bleed when creating the document. Then export as a PDF/X-1a or PDF/X-4 with “Use Document Bleed Settings” checked.
To put it all into practice, let’s look at how the three zones are defined for a standard 3.5″ × 2″ business card:
- Trim Size (Final Product): 3.5″ × 2″
- File Size (Trim + Bleed): You add 0.125″ to all four sides. The file you submit must be 3.75″ × 2.25″.
- Safe Area (Trim – Margin): You subtract 0.125″ from the trim line on all sides. All critical text must fit within an invisible box measuring 3.25″ × 1.75″.
Standard North American Safety, Trim, and Bleed Sizes:
| Product | Safe Area | Trim Size | File Size with Bleed |
| Business Cards | 3.25″ × 1.75″ | 3.5″ × 2″ | 3.75″ × 2.25″ |
| Postcards | 3.75″ × 5.75″ | 4″ × 6″ | 4.25″ × 6.25″ |
| Postcards | 4.75″ × 6.75″ | 5″ × 7″ | 5.25″ × 7.25″ |
| Postcards | 5.75″ × 8.75″ | 6″ × 9″ | 6.25″ × 9.25″ |
| Flyers (Half Letter) | 5.25″ × 8.25” | 5.5″ × 8.5″ | 5.75″ × 8.75″ |
| Flyers (Letter) | 8.25″ × 10.75″ | 8.5″ × 11″ | 8.75″ × 11.25″ |
| Posters | 17.75″ × 23.75″ | 18″ × 24″ | 18.25″ × 24.25″ |
| Posters | 23″ × 35″ | 24″ × 36″ | 24.25″ × 36.25″ |
For larger pieces such as Large Format Posters or Vinyl Banners, many printers recommend a wider safe margin, often 1/4″ to 1/2″ to account for frames or mounting, while the bleed usually stays the same at 1/8″. For example, with a 1/2″ safe margin, a 24″ × 36″ poster is better to have a safe area of 23″ × 35″. Always check the product’s Artwork Guidelines to make sure.

Special Cases to Watch For
Not all products follow the standard 0.125″ rule. Watch out for these specific finishing requirements, which may add to the safe margin:
- Film Laminations: Lamination requires a raw substrate to adhere to. For example, if you are quoting Low-Tack Adhesive White Vinyl with Film Lamination, the client must leave at least a 1-inch white margin on all sides of the artwork. This ensures the laminate sticks better and lasts longer without peeling.
- Contour-Cut Shapes: If a client orders a rounded-corner product or a custom shape (like a star or a logo cutout), it needs a larger safe area and bleed, as complex angles are harder to cut perfectly square than a straight line. Also, provide a cut line on a separate spot-colour layer set to overprint in Illustrator or InDesign, so the machine knows exactly where to cut without printing the outline onto the final artwork.
- Hems, Grommets and Canvas Wraps: Banners require a massive safe area because installation accessories sit right on the edges. Hemming uses about 1 inch of material, folding it over the back. Additionally, ButterflyGP.com uses standard 0.75″ metal grommets placed 1″ from the edge, measured to the centre of the grommet. To avoid having a metal ring punched straight through a logo, advise your clients to keep all critical text at least 1.5 to 2 inches inside the trim edge. Also, canvas needs wrap allowance, often 1.5″ or more on each side.
- Pole Pockets: If a client orders a backdrop or fabric banner, they often select a 2-inch or 4-inch pole pocket at the top and bottom. This effectively hides part of the design at both ends. The artwork must push the main design further in so that logos and text don’t bleed into the spaces where the fabric will be folded and sewn to create the pocket.
- Belt Reinforcement: For heavy-duty large-format finishing like belt reinforcement, ensure the design features a 1.5-inch safe area margin so the belt does not overlap critical graphics.
- Tri-fold Brochures: The panel that folds in should be about 1/16″ to 1/8″ narrower than the others so it doesn’t buckle when closed. Treat the fold lines as additional safe areas.
- Saddle-stitched Booklets: Inner pages push outward (or “creep”) as the page count increases. Content near the outer edge of the centre pages needs a larger safe area, or the printer needs to compensate for the creep.
Conclusion
By checking every client file for bleed, trim size and safe area before ordering, you can eliminate most printing errors and protect your client’s satisfaction as well as your own margins. A print proof also catches most problems before printing starts and helps avoid costly reprints.
With ButterflyGP.com as your wholesale partner, you don’t have to navigate tricky file requirements alone. You can consult the specific artwork guidelines and templates for each product, or contact our expert print team for guidance. And when you’re ready to quote your next project, explore the ButterflyGP.com catalogue with our trade-exclusive pricing, reliable turnaround and blind shipping.
Frequently Asked Questions
What is the standard bleed size?
The industry standard for small-format commercial printing (like business cards, Postcards, and Flyers) and most large-format products is 0.125 inches (1/8″) of bleed on all four sides of the document.
What happens if I ignore the safe area?
If you place text or logos outside the safe area, normal cutting tolerances mean your critical information could be sliced off during production. Even if it isn’t cut off, text sitting too close to the edge will make the final product look unbalanced and unprofessional.
How much safe area do large-format prints need?
Large-format items like banners require much larger safe margins than small paper prints. Because banners are hemmed and punched with metal grommets, keep all important text at least 1.5 to 2 inches away from the final trim edge.
How do I set up safe area, trim, and bleed lines for printing?
In professional design programs like Adobe Illustrator or InDesign, enter the finished trim dimensions in your initial Document Setup, and add 0.125″ in the Bleed fields. In InDesign, set the margins to 0.125″ to mark the safe area, and in Illustrator, add guides 0.125″ inside the trim edge. When exporting your final print-ready PDF, choose PDF/X-1a or PDF/X-4 and check “Use Document Bleed Settings.”